
Introduction to Design for the Laser Cutter
One of the absolute most popular pieces of equipment in our makerspace is the laser cutter, but many are nervous about getting started on it because the design process feels overwhelming.
Our design-program-of-choice is Adobe Illustrator because our students learn Adobe Photoshop in intermediate grade tech classes, and we’ve used other Adobe products in the past too. Many schools use Inkscape, which is FREE!
When I learned Inkscape this summer at DesignDoDiscover, I found that it had a lot of the same look and feel as Illustrator. In addition to introducing Adobe Illustrator here, I’ll speak to comparisons to Inkscape when it makes sense.
Initial File Setup
For laser cutting, my students start from the very beginning planning for the particular piece of material that they will be cutting on. Most of the time, that means cardboard. Identify the piece of cardboard, measure the width and height as well as the locations of any creases, and then open Illustrator to create your new file.
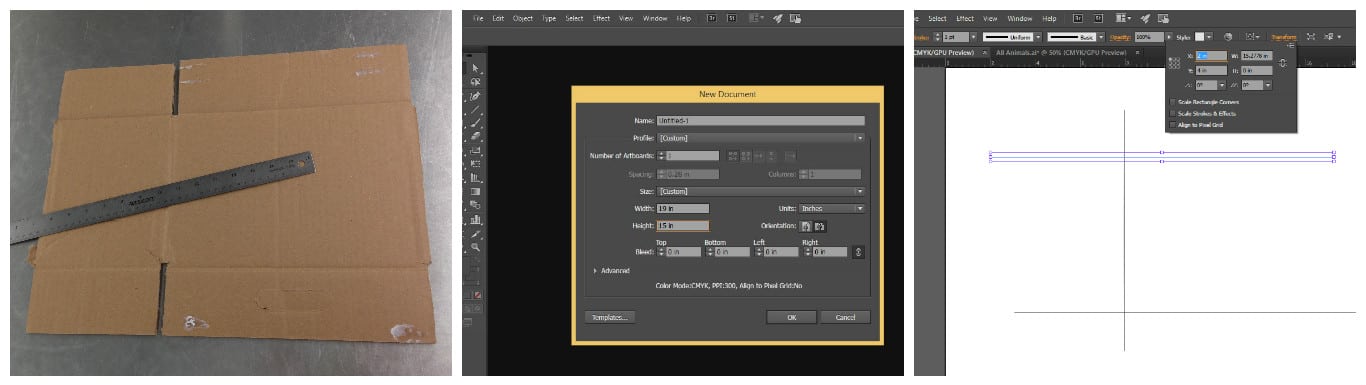
As shown in the pictures above, the basic steps for setting up a file are:
- Measure the width and height of the piece of cardboard. In this case, 19″ x 15″.
- Measure the locations of any cuts or creases in the cardboard. In this case, a vertical crease 8″ in from the left side, and two horizontal creases 4″ and 11″ from the top.
- Create a new file in Illustrator. Change the units to inches (sorry, metric purists–it’s easiest to talk to our laser cutter in inches), and set the width and height of the file to match the piece of cardboard.
- Using the “line segment” tool, create the correct number of horizontal and vertical lines to match the creases you need to mark. In this case, one vertical and one horizontal.
- Set the locations of the lines in the file to match the locations of the creases on the cardboard. You can do this by selecting one of the lines, opening the “transform” menu and setting the X or Y coordinates to place the lines. In this case, I set the vertical line’s X coordinate to 8″, one horizontal line’s Y coordinate to 4″ and the other horizontal line’s Y coordinate to 11″.
- If you want to move the lines manually, you’ll need to switch out of the “line segment” tool and into the “selection” black arrow tool. The “selection” tool is the only tool that lets you move objects around. The “line segment” tool will only continue creating new lines.
If not cardboard, the other most common materials we use are craft plywood and sheet acrylic, both of which come in standard sizes (24″x12″ and 12″x12″ respectively) and so are easy to design with. However, we use every scrap we can, so we might be designing for a 6″ square area of wood that’s 4.5″ from the left edge and 2″ down from the top edge, and otherwise full of holes from previous cuts. In that case, the design will also need to account for the location of the cut-able area.
The steps using Inkscape are similar, except the size of the overall page is set in File / Document Properties. Lines can still be placed at specific X and Y coordinates using the Object / Transform menu option.
Now you can design without worrying about having your designs overlap any creases or holes in your cardboard!
Beginning to Design: Simple Shapes
For basic geometric shapes, the “line segment” and “rectangle” tools are excellent and easy. If you mouse click-hold over the “rectangle” tool, you’ll see a menu of other geometric shape tools appear, including “ellipse” (i.e. circle). The “line segment” tool can allow you to make any other rectilinear shapes, and the “text tool” is pretty self-explanatory.
Finally–and a common challenge for both my students and colleagues–the black arrow “selection tool” is the only tool that will let you move objects around, change their shapes directly or even just select them for manipulation. (There’s also the “direct selection tool” right next to it, but that does something more complicated.)
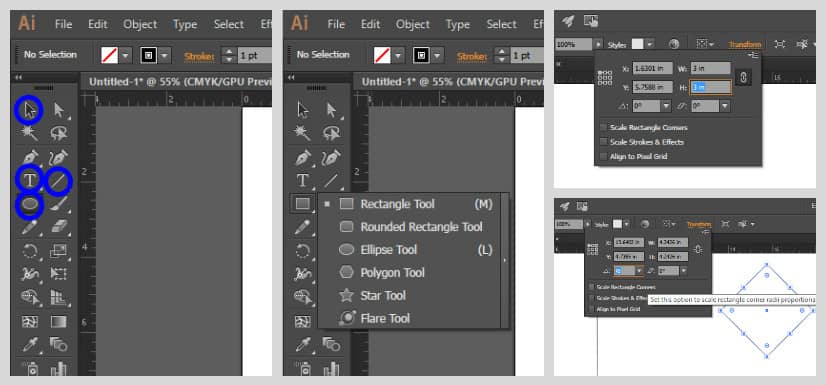
Once you have placed shapes that you want, you can again use the “transform” menu to change the object’s shape to the exact size you need, as well as place it at X and Y coordinates or rotate the object. Rotating lines can be a great way to create exact angles when needed, such as the roulette-wheel-like spinners many of my students are currently creating.
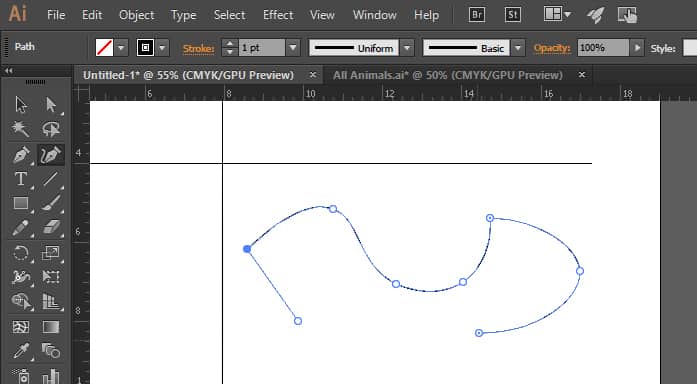
But we seem to almost never want to make simple shapes, so there’s a different tool that is our bread-and-butter: the “curvature tool.” Rather than creating a specific shape, the curvature tool lets you drop points that you can assign to be curves (single click) or corners (double-click) on the shape you’re creating.
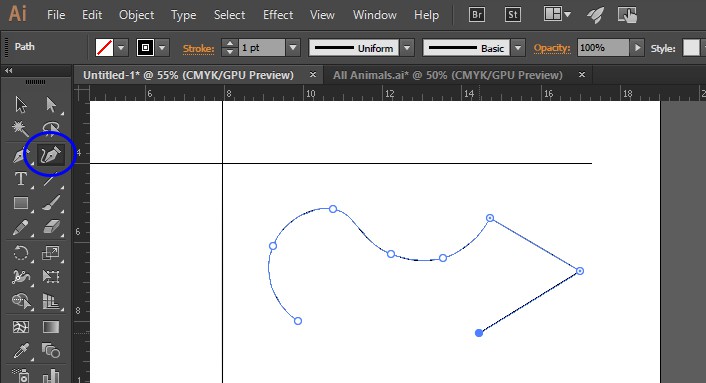
If you play with the curvature tools for a few silly shapes, you’ll get the hang of it pretty quickly. One key point to keep in mind: to move the whole curvature shape that you’ve just created, you must switch back to the black arrow “selection” tool. But you can change points (actually called “nodes”) from curves to corners and vice versa by double-clicking with the curvature tool! You can also move individual nodes to tweak the shape to your exact needs.
A good general heuristic is: If you want to move or resize the whole object, use the “selection” tool. If you want to move or change individual nodes, use the curvature tool.
See if you can spot the switches between curves and corner, and node movements, between the version of the shape above and the version of the shape below.
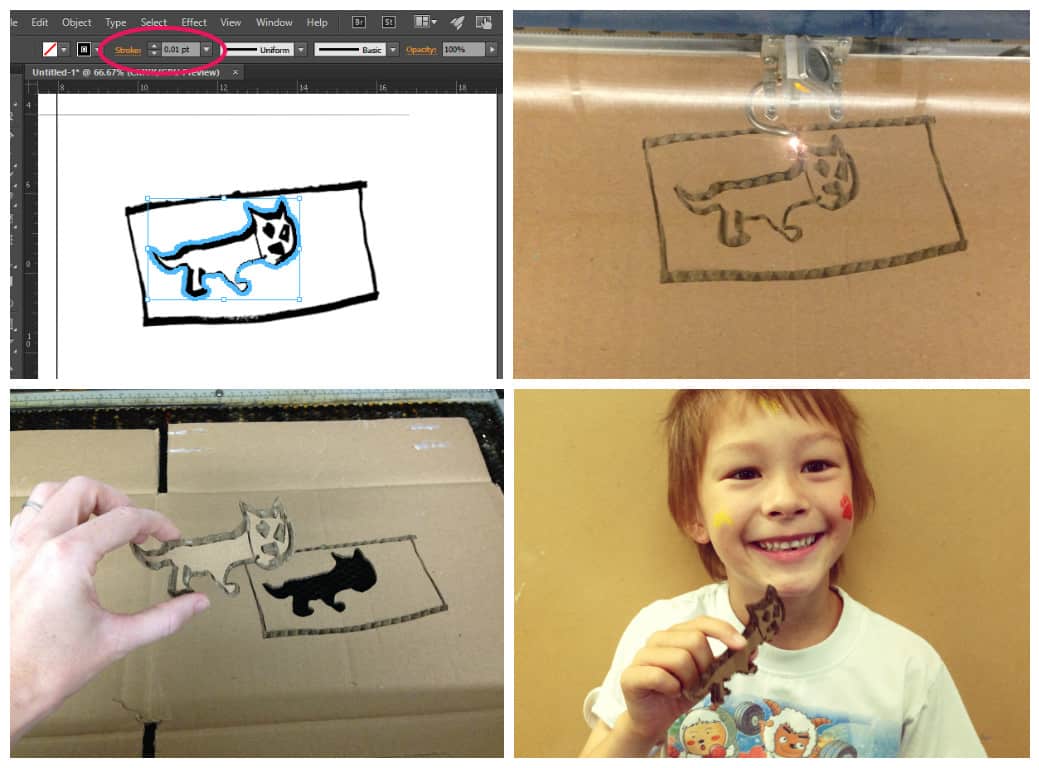
When your design is just the way you want it, you MUST select all of the lines that you want to actually cut and convert their “stroke” size to 0.01 pt. Stroke size is set in the upper left corner, right next to where you setup fill and outline colors. This stroke size is what ultimately tells the laser cutter to cut that line, rather than etch it. This is THE MOST common mistake my students make in their designs! And then they get annoyed with me when I hand them a giant piece of cardboard with a bunch of squares and circles etched onto it, instead of a neat little stack of cut-out squares and circles.
Inkscape similarly has a selection tool, rectangle and ellipse tools, as well as other polygons. There’s a tool called “Draw Bezier curves and straight lines” that I haven’t figured out yet. It seems that the default for that tool is to draw rectilinear shapes, and then you can change the different nodes to curves using the “Edit paths by nodes” tool higher on the toolbar.
More Complex Design: Silhouettes and Scans
One of the most common things we want to do is cut out particular shapes based on images found online or student-drawn images.
For example, one of my students drew a beautiful fox that she wanted to etch onto a piece of wood and then cut out for the pendant of a necklace. Because we were still learning Illustrator, she used the “curvature tool” to hand-draw a line around a scan of her drawing. Now, however, we use a feature called “image trace” that will create a cut-able path around an object.
I don’t understand all aspects of the “image trace” feature, but I’ve figured it out well enough for all of our needs so far, at least. Here, I’ll take your through an example using a picture drawn by my son…

The steps for taking a drawing from paper to ready-to-laser-cut are, basically:
- Scan or take a very clear picture of the drawing with no shadows.
- Get the image into your Adobe Illustrator file. There are a couple of ways to do this:
- I like to open the file in Adobe Photoshop first, so I can convert to grayscale (Image / Mode / Grayscale), bring the contrast way up (Image / Adjustments / Brightness and Contrast), and then “posterize” to two levels to convert to a perfectly black-and-white image (Image / Adjustments / Posterize). Then I use Photoshop’s “rectangular marquee tool” to select the image, copy it (ctrl-C), switch over to Illustrator, and paste it (ctrl-V).
- If your image is already black and white enough and cropped to the right size, you can open the image directly in Illustrator (File / Open), and select/copy/paste from within Illustrator.
- If you try to copy-paste directly from the file directory, or try to drag the image file directly into Illustrator, this links the image back to the original file instead of embedding the image directly into the Illustrator file. You’ll see a blue X over the image when it’s selected if that’s the case. You’ll need to click the “embed” button to really get the image in there.
- Get the image in place and size it how you want it using the “transform” menu, or using the “selection” tool and dragging the corners of the selected image.
- Select the Object menu / Image Trace / Make and Expand. When the tracing is done, you’ll see your image outlined in blue, indicating the nodes that Illustrator identified. Right-click and select “ungroup”.
Illustrator then does this weird thing where it outlines all of the black areas AND all of the white areas of the image so that every line is essentially outlined twice. There are ways of avoiding this, but I’ve found those ways to be more cumbersome even than this.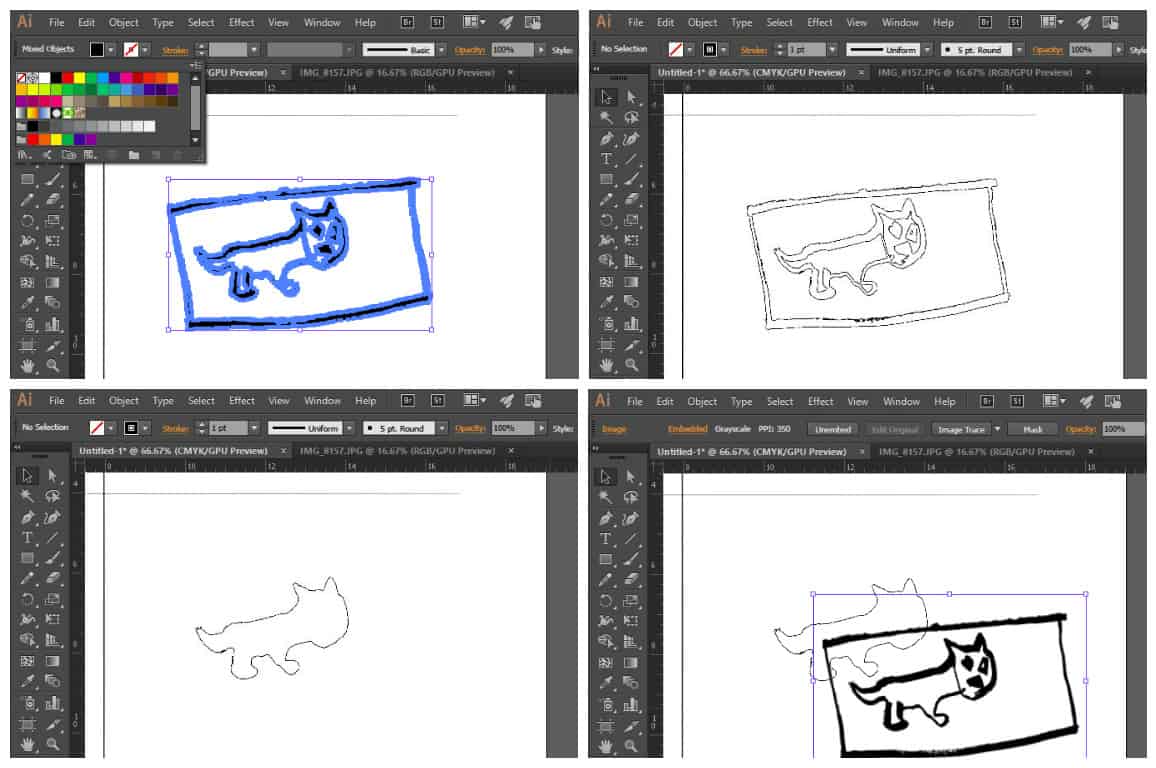
- Deselect the traced image, and then – since you ungrouped the whole tracing – select each white space individually and delete it. Don’t forget little spots like the eyes!
- Now select the whole image again (click-and-drag a full marquee around the image), and in the upper left corner, change the fill to “clear” (a white box with a red diagonal line) and the outline to black. This will allow you to see all the individual lines that Illustrator has traced, so now you can decide which lines you actually want to cut.
- For this example, I want to just cut the outer shape of the little cat. I delete the lines for the outer box and all of the lines inside the cat. For some of the traces, I need to right-click and select “release compound path” to be able to delete one segment of a line without deleting the other.
- You may run into more complicated traces where you need to delete or move nodes, or even open paths and reconnect them differently, but I won’t get into that level of detail here.
- At this point, you can be ready to cut out your trace. For this example, I want to etch my son’s drawing onto the cat outline trace. To do something like this, paste in another copy of the original image, and size and line it up to sit right inside the outline trace.
This particular feature is almost identical in Inkscape: Once the image is in Inkscape, Object / Image Trace, then a lot of ungrouping and deleting the right lines to get just what you want.
As with the simpler shapes above, when your design is just the way you want it, you MUST select all of the lines that you want to actually cut and convert their “stroke” size to 0.01 pt. Stroke size is set in the upper left corner, right next to where you setup fill and outline colors. This stroke size is what ultimately tells the laser cutter to cut that line, rather than etch it.
And don’t forget that you first designed your file to take into account a specific piece of cardboard, so be sure to use that piece of cardboard for the final cut!
Outside Apps
I also rely on a few automated third-party apps to produce files that would otherwise be tedious or too imprecise if I made them myself.
There are many box generators for laser cutting, and I most often use Box Designer. It produces vector lines to cut all sides of a cube with notched sides so that the sides fit together perfectly.
I also really enjoy Gear Generator, which lets me produce vector lines for gears of any diameter, tooth size or even different tooth pitches. It’s also just beautiful and demonstrates how exactly your planned gears will work with each other.
I Hope This Helps!
Those are the features that my students and colleagues most often request to learn, as well as the features I most use myself. I’d love to learn more about what other features people rely on, as well as other helpful apps for producing excellent laser cut objects. Please feel free to leave me a comment here about what you are using or tag me in a tweet using @LindseyOwn.
For more, see:
- Maker Space Promotes Problem Solving & Computational Thinking
- Maker Education for All Ages
- MakerEd Micro-Credentialing: Teachers Want to Play, Too!
Stay in-the-know with all things EdTech and innovations in learning by signing up to receive the weekly Smart Update.


Lindsey Own
Since publishing, I've been sent two amazing laser cutting design resources produced by other teachers...
Erin Riley's incredible and simple handout for students getting started on Illustrator, at Greenwich Academy in Connecticut: http://erinriley.weebly.com/uploads/2/1/0/8/21080698/explore_illustrator_tools_.pdf
Jason Mickelson's Inkscape (and other!) guides at Chinese American International School in San Francisco:
http://www.888designlab.org/inkscape.html
http://www.888designlab.org/laser-cut-stand-up-figure.html
Thank you, Erin and Jason!!!!
Matthew Dillon
Hey Lindsey,
Thanks for this...I have never tried "image trace" but I am going to. We use Inkscape so I'll have to see how theirs works.
Matthew
Chris Pederson
I had no idea that the stroke size is what tells the laser to actually cut rather than etch. I think I am going to make a design and then send it to someone to cut it for me. I don't have a laser cutter but I do have the program for it.